- This blog is sure a lot more fun to work on when I've got a few beers down the hatch.
- Need to get some Norm Abrams DVD's
- Cholula is awesome on Taco Bell tacos.
- Need to start getting plans together for the Galley cabinets
Wednesday, March 28, 2012
Lessons Learned
Some thoughts on the trailer build:

Lights, check.


Slightly concussed
So I started doing some of the preliminary work on the cabinets tonight when my head was suddenly introduced to something hard and unforgiving for the second time this week. I managed not to get any blood on the trailer, but I decided to retreat into the house. Perfect timing for blog updates.
 |
These will be perfect for storing all sorts of contraband and other nonsense the authorities don't approve of.


 |
| Add witty and clever caption here. |
Here is an attempted shot at the inside of the cabin after putting the ceiling in. Notice the light colored lid, and the dark walls.... definitely interior decorating here. Just wait until I get the tapestries on the walls, and the bear skin blanket that will cover my NASA foam mattress when I am done. Perfection.
 |
You may have to hold your head like an ostrich to get an idea of what this looks like. Check out the bracket that will be house the shutoff switches for the entire trailer. They are 30 amp switches. I made that thing with a drill press and some angle I had laying around. It doesn't look like a hack made it when you look at in person, but the audience should know better. That inline fuse is so that I don't burn the whole trailer down when my 25 amp coffee maker kicks on in the morning after I turn it on with my Arduino poowered key fob. |
Sunday, March 11, 2012
Progress

Flooring is in. I've got the side walls insulated, wiring in. Next step is to finish the hatches in the cabin and then to start framing the ceiling in the cabin
Sunday, March 4, 2012
Teardrop - More progress
I started the weekend with the goal of getting the walls up on the Teardrop. Goal met!
 Here is the first wall going up. I've got a 2x4 propping it up from the other side to keep it from falling over.
 Now both walls are up. The framing in between the walls is the start of the bulkhead which will separate the galley from the cabin.
 Looks like I fit!


 After framing, I started paneling the rear of the cabin. It's 1/4" hickory paneling that has been treated and is water resistant. Cool stuff.

 Here's a shot of the galley, featuring the deep cycle battery I picked up today.


More framing of the bulkhead going in. Framing is 3/4" pine that is glued and screwed.

Rear Bulkhead framing complete.

 After framing, I started paneling the rear of the cabin. It's 1/4" hickory paneling that has been treated and is water resistant. Cool stuff.
Rear bulkhead and completed paneling.


And the galley with some paneling. Next step is to start running wiring where I need it to go before skinning the interior walls of the cabin
Sunday, February 26, 2012
Teardrop Trailer Build
I've just started working on a Tear Drop Trailer build, and thought this would be a fun way to document the experience.


 The trailer floor is now bolted to the trailer, and all of the hidden compartments have been cut out. Next step is to start framing in the hidden compartments, and then once that's done, put some lids on them.


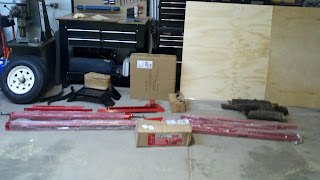
This is the box of trailer parts that showed up in the mail after I got tired of looking at Teardrops and decided to build one. I decided the spare tire and front jack was a good investment.

This is the trailer under assembly, along with one of the side panels to check for length. Looks like I'm going to have cut part of the back off to make the trailer match the length of the side wall.

Here's one of the walls I cut. It's the profile that the trailer will have when it's all finished. Notice the huge door. Should be easy to crawl in and out of.

Most of the trailer is assembled, and floor framing has started. This is the beginning of the floor framing. The two pieces of plywood are actually "hidden" storage, and will be accessible via hatches in the galley and the kitchen. The floor is framed with some 2x4s that I cherry picked out of the stack at Home Depot. I got lots of dirty looks, but a man's got to do what a man's got to do!

More Trailer sub floor stuff.

I finished framing the floor, and started painting the bottom with asphalt emulsion to help keep moisture out. Careful with this stuff, I almost lit the whole trailer on fire tonight when my router kicked some sparks into some wood shavings and lit a fire. Very exciting for awhile in the ole' garage tonight!

After painting the bottom of the trailer with the emulsion, I laid 3/4" insulation down and covered it with sheet aluminum. The remaining black plywood in the floor will be routed out and be used as access holes for the hidden hatches.

Here's another pic of the floor

Insulation getting laid out before covering with sheet aluminum

Yep, here's the floor again.

Trailer at an early stage of the build


Here's a closeup of the spare tire that I installed on the bottom of the trailer tonight. It's held in with carriage bolts suspended from the floor. The floor has been reinforced with 3/4" plywood here that is covered in insulation and aluminum. The wing nuts are secured with pins to prevent backout.

Here's another picture of the spare mounted below the trailer.
Subscribe to:
Posts (Atom)